How to think in CSS?
For those who are new to front-end web development, CSS can seem like this weird, magical realm full of rules that do not make much sense. This article is about the approach I take to ‘CSS-ing’ a project. Given a vision of a webpage, how should we go about creating it?
While at the Recurse Center, I worked with other Recursers (who were new to front-end web) to better understand how to work with CSS. The following guide is a cumulation of tips that I’ve shared that have been useful to them, and hopefully to you too!
For this guide to be useful, you should at least be familiar with basic HTML and CSS concepts such as the difference between the two, tags, selectors, classes and ids.
Step 1: Get sketchy
So I wanna build this thing…
We often start a web project with a vision in mind. For example, you want to build a name matching game. Given a photo of an animal, what is its name? 1.
This is how your sketch might look like. This process is also known as wireframing.
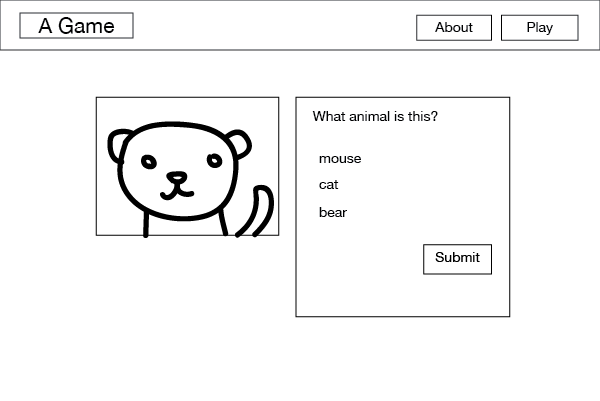
sketch your app
You would have a vision of how you’d want the app to look like. The first thing to do is to sketch it out. A simple napkin sketch will do. This will give you a much better idea of the parts you will need to build your app.
1.1 Think blocks
After you’ve sketched your vision out, label the different blocks. Think of blocks as chunks of your app. Blocks help us break content on a page down into manageable chunks, and it also helps us identify reusable components of your app.
For example, here are the blocks you might have for this app. Each block may contain several elements.
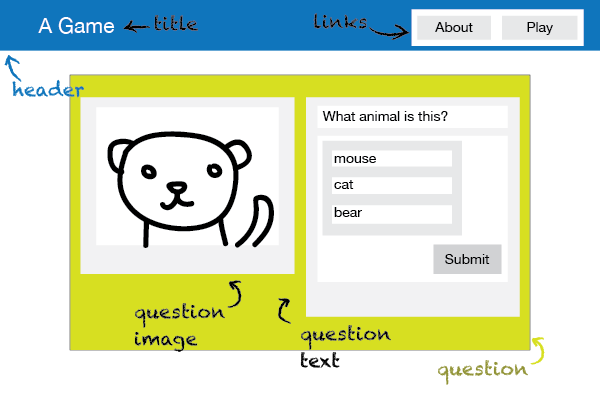
break it down into blocks
First, we’ll have a header for navigation and link elements.
Each question in the game comes with an image, a question, potential answers, a hint button and a submit button. We’ll wrap all of this in a question block.
The image is in its own column to the left, and we’ll call it the question image block, and it will contain an image element. The question text, answers and buttons should be in their own column to the right, and we’ll call this the question text block.
Step 2: Start with good HTML
I cannot stress this enough. It is impossible to write good CSS with messy HTML. Aim to keep your HTML as clean, and minimal as possible.
Go back to your sketch. Identify which HTML tags you would use for each block and element.
2.1 Use semantic tags
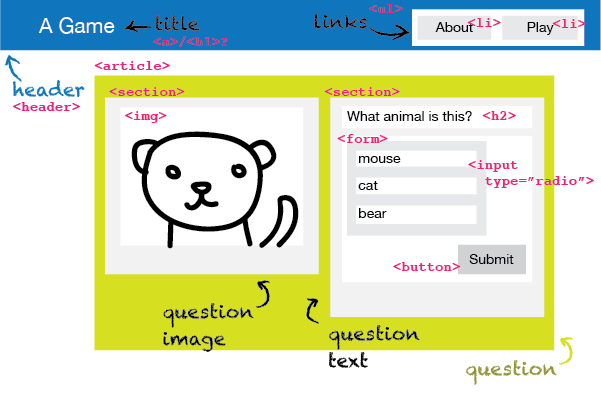
use tags that accurately describe your blocks and elements
Choosing semantic HTML5 tags makes it easier to navigate your code. You can use divs for almost every element, but imagine what it would be like navigating your code 2 weeks from now. ‘Semantic tags’ in this context means tags that accurately describe your content. Is it a title text? Use h1 to h6 tags. Is it a footer? Use the footer tag instead of a div.
What are semantic tags? For example, use the header tag for your header block, and the form tag for your question text block. Use single containers for each block.
Add classes as you go along to identify each block. Now will be a good time to add a .question class to the container that holds the image and text. You might want to add a .question-image and .question-text class respectively to the image and text columns.
Don’t worry too much about how you will use these classes in CSS. Just label things in a general way that makes sense. I’ve found that this approach helps with styling later on, versus the other way around of thinking about styles first, and classes later. Good layout comes with breaking things down in ways that makes sense.
2.2 Code
Here is an example of how I would have done the HTML:
See the Pen How to CSS example - HTML by Sher Minn Chong (@piratefsh) on CodePen.
Step 3: Layout, layout, layout
And now, we make it pretty, yes?
Not yet! Before we do any aesthetic stuff, we must first layout the blocks. You can think of layout as ‘putting blocks in places where they belong’. Don’t worry about making things look good right now, just focus on placing them where they belong.
3.1 Learn the basics
Ah, gotcha. But how do I layout?
There are many parts to creating layout. I won’t go into details for this post, as there are many resources for this.
I would highly recommend Learn Layout as a comprehensive guide to learning how to put things in place.
Here is a list of things you should know to create layouts, in order of introduction:
The Basics
- The Box Model - Learn Layout guide
- Display - Learn Layout guide
- Position - Learn Layout guide
- Flexbox - Flexbox Froggy tutorial, Learn Layout guide
Flexbox is relatively new, but is extremely useful and intuitive in creating layouts. It is not fully supported across all browsers (yet), but it’s pretty great, so I would highly recommend getting familiar with it.
3.2 Top down
When creating layouts, think top down. Position the larger, encompassing blocks first before positioning the blocks within them.
For example, position the question block first before positioning the question image and question text within it.
3.3 Code
Here is an example of CSS I would use to create the layout:
See the Pen How to CSS example - HTML by Sher Minn Chong (@piratefsh) on CodePen.
Step 4: The small details
And now we move on to the details! When everything is in place, start going crazy with styling! This includes things like fonts, colors, borders and any other embellishments.
This is your time to shine! Apart from choosing colors and fonts, little things like gradients, box shadows, and border radius (for rounded edges) make a difference! For that extra bling, look up CSS transitions and :hover to get that cool animated effect when you mouse over your buttons.
I always find it useful to browse inspiration and to keep track of designs and color schemes that I like. I used to keep an inspiration folder where store the ones that I enjoy the most, and it’s super useful to reference when you’re stuck on ideas.
End
Hopefully that was somewhat useful in helping you to form a working process when converting a visual into CSS! This is meant as a starting point, and just one way to go about doing it. You will form your own processes as you CSS more.
Have opinions or questions? Let me know at sherminn [dot] chong [at] gmail [dot] com.
Have fun!